Pages

December 16, 2016

December Album - Days 1-3

Hi there!

I'm up today with days 1-3 in my December album.  It's been slow going for me this month. It's been pretty busy at work and with life.  But, I am taking photos and writing notes, so it's just a matter of getting the pages done.

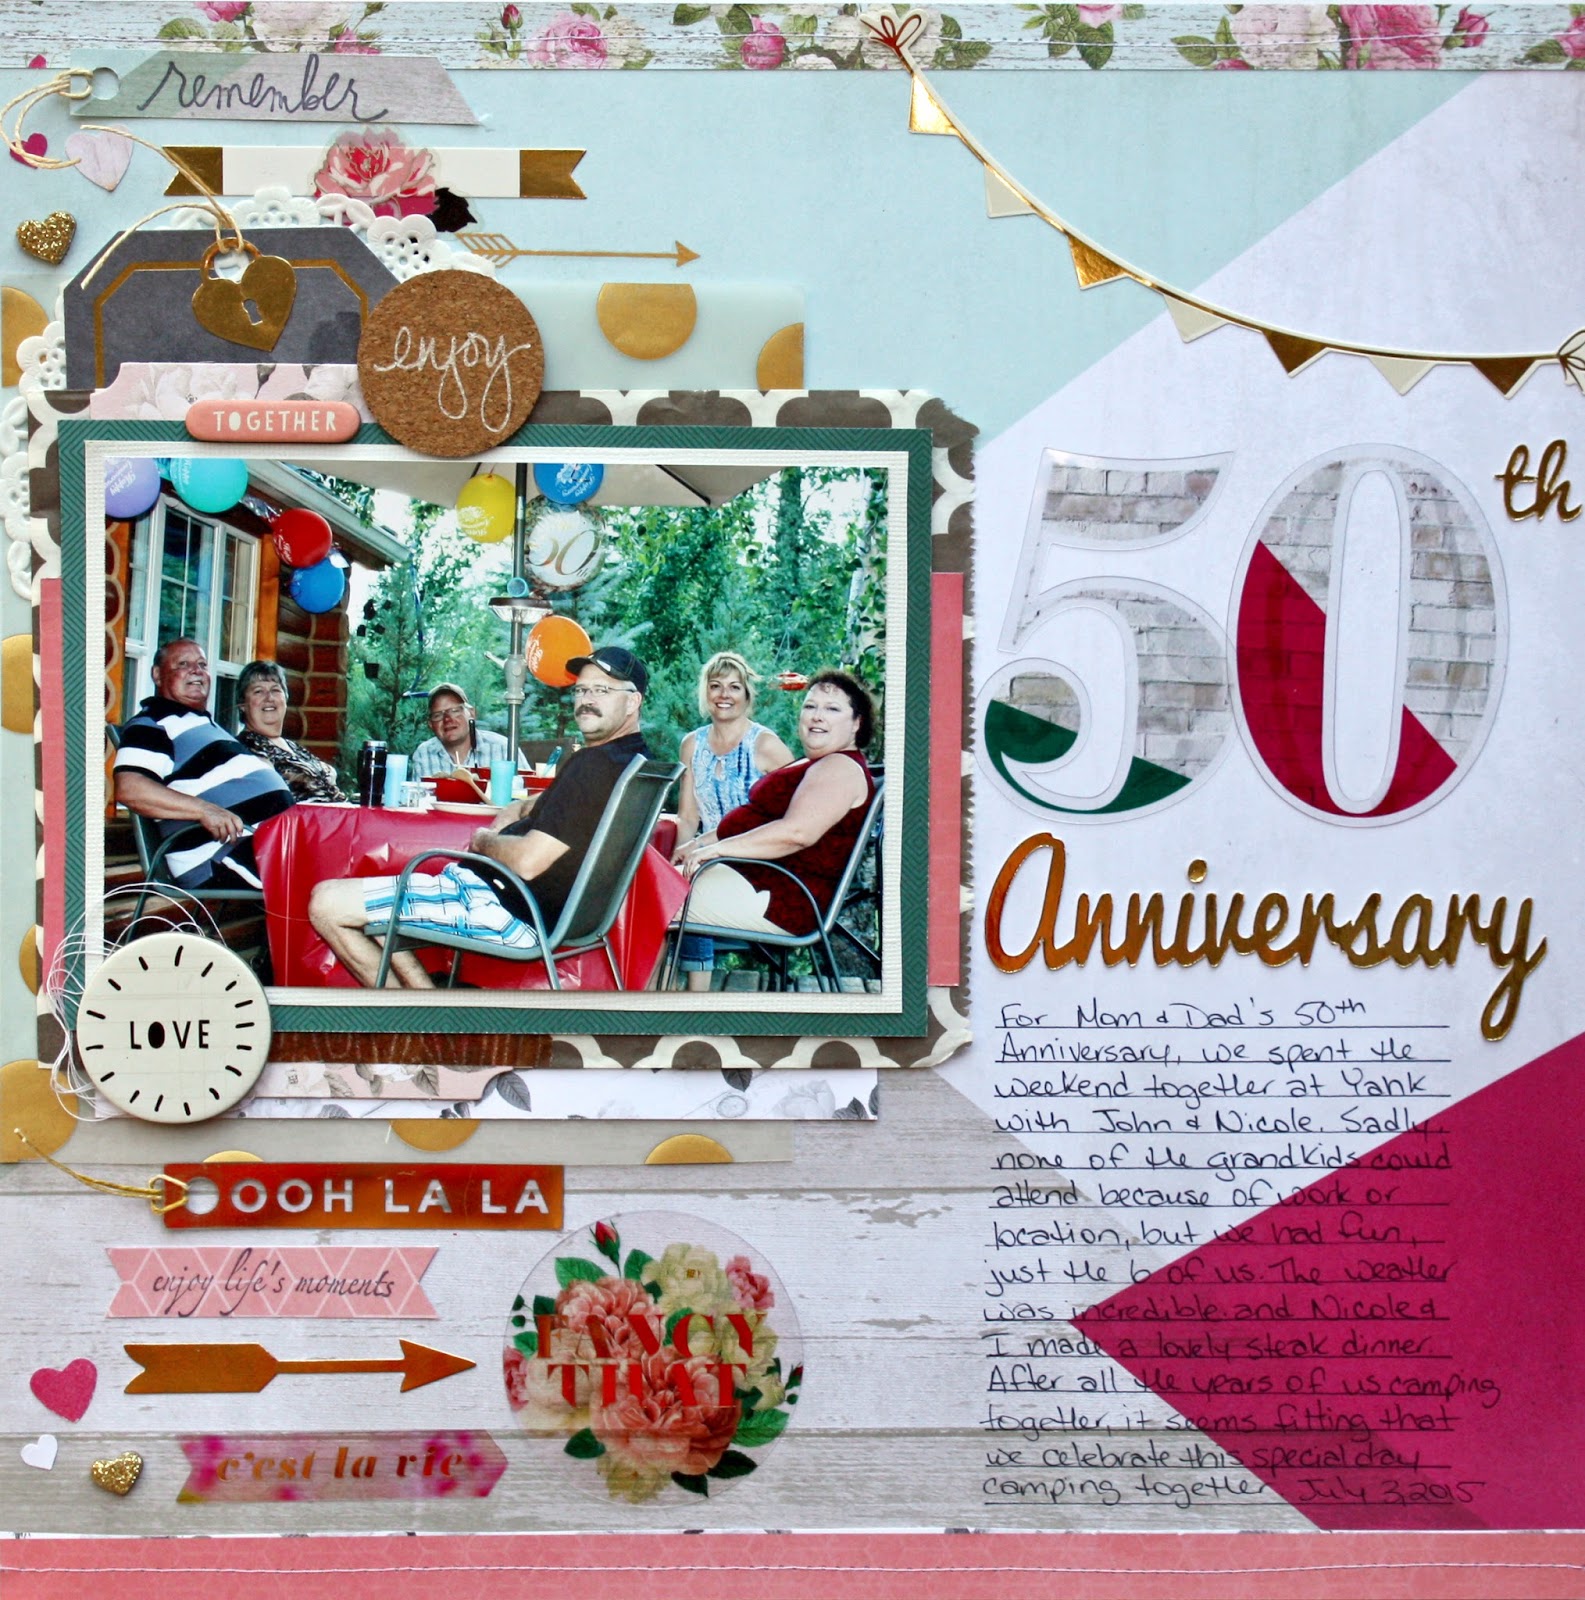
I'm working with the Simple Stories Classic Christmas collection and throwing in some old stash.  The page above is a mixture of both. The grey background is the packaging from a package of SEI diecuts that is a few years old and a Simple Stories journaling card.  The snowflakes are from the Classic Christmas Collection. 


The little 2x2 pocket page protectors are so cute. I had to cut this photo in half to make it fit, but I think it still works. The sequins are from Studio Calico and the sticker is Crate Paper.


For Day 3, I used the Simple Stories 2x2 cards for the inserts. I used glossy accents to make the windows on the house look like glass.  The "home" is fussy cut from another journaling card and glued onto the heart card. The journaling is on the facing page and I used Technique Tuesday  (celebrate), American Crafts (home sweet home) and unknown alpha stamps for the embellishments.

This is the back of the journaling card. I covered the "glass" image of the snow globe with more glossy accents and sprinkled chunky white glitter into it while it was still wet.  In real life it does look like the snow in a snow globe. The banner is stamped with an American Crafts date stamp and the holly is a Martha Stewart punch with Pebbles gems. I added a pen outline to the journaling card and the banner.

I'm starting to love how this album is looking.  I'm keeping it pretty simple, so even though I am behind, I have every confidence that I will get it finished before the middle of January.  Ok.  February at the latest.  HA!

Thanks for looking!
Sylvie

December 2, 2016

December Daily 2016

Hi there!

Today, I am sharing my December Daily album for 2016.  This is the fourth year that I've done a December album and this is the first time that I am using a real album.  The other three albums were homemade mini albums.  When I found this little gold We R Memory Keepers 4x4 album in a sale bin, I fell in love with it.  And it was on sale for $8.00.  SOLD!


I decorated the cover with some very old Making Memories snowflake ribbon and white and red twine.  The camera die cut is a leftover from Shimelle's Christmas line from last year and the stickers are Simple Stories. 

I will be using the Simple Stories Classic Christmas line for most of my pages, as well as some left over papers and embellishments from previous projects.

I wanted to make a cover page for the album, so I used some scraps to make a fringed heart. I placed it on a piece of metallic acetate paper, also from We R Memory Keepers. I trimmed it into a decorative shape and topped it all off with a paper bow from a gift wrapping set I found at Winners. Isn't it cute?


My intentions page is typed from my typewriter and decorated with a hand cut star. It's actually a gold metallic paper star, but the gold doesn't show in the photo.  I decorated the star with a flower from a Martha Stewart punch and a Bo Bunny rhinestone.


I love how it all looks in the album, layered on top of each other.


I'm really looking forward to working on my album this year. It's such a fun project and looking through the album, years later is just such a treat.

Thanks for looking!
Sylvie

November 18, 2016

Mixed Media Envelopes

Hi there!

I've been MIA for a couple weeks.  Life has been quite hectic and there has been no time to scrapbook.  But a couple of weeks ago, my group of friends come over to learn how to do some mixed media.  This is what we created.


We have a group of nine that gets together monthly for a glass of wine and a clothing club.  Every one writes a cheque for $30 and one of us wins the pot once a year.  We started when the kids were very little as a way for the moms to have an outing.  That was almost almost twenty years ago! 

I did have to make a couple for those that weren't in attendance.  But, the girls that were there went wild with embossing paste, stamping, spray mist and ink.  And lots and lots of glitter! 

My envelope is based on the lovely Kelly Klapstein's design. She has awesome tutorials on hand lettering. I'm working on it and I'm getting better, but I still have a long way to go.

These envelopes hold our cheques until you win the pot.  They are my design as they have to fit into a small box for storage. We did this a number of years ago and it was time for new envelopes. We had a lot of fun, but then we always do. We should really to do this kind of stuff more often.

My husband is still vacuuming glitter from the kitchen floor.  ;)

Thanks for looking!
Sylvie

October 29, 2016

Our Journey Began Here

Hi there!

I'm up today with another Las Vegas Album page.  It seems funny to be scrapping our last vacation when we just returned a week ago from a different trip, but I'm hoping to get through this project quickly so I can get started on the recent one.  We didn't take a lot of photos on this trip, so I'm going to do mostly pocket style scrapping with the odd 12x12 page thrown in.


Once again, I used the Go Now Go collection from Shimelle Laine with a few odds and ends from my stash.  The colours and theme seem to work really well with my photos. I loved this piece of patterned paper, but I had used the front of it for my title page. I didn't want to waste it, so I just used it as my background.  Luckily, I didn't do anything on the other side to worry about, and it worked well.  There could be no brads or sewing that would disturb the other side, but other than that it worked just fine. The paper isn't overly sturdy, and I worried about all the weight I was adding to it, but now that it is in the page protector, it's fine.

The word Journey is actually cork from the Crate Paper Journey collection, but it was getting lost on my page. I used some StazOn ink and changed it to black. Some of the cork peeks through in real life and it gives a lovely texture. 

There are more sequins on both of these pages with a lot of gold accents. Really.  If you can't use glitter and metallic on a page about Vegas, when can you?  ;)  The little blue alpha stickers matched the colours of the paper so well, but they had silver metallic letters. I used both gold and silver sequins to bring it all together.


Of all the photos we took, we forgot to take one of the room and of the resort itself.  So, I went to Google images and found some photos of both.  The room photo is exactly what our room looked like; right down to the decorative pillow and art work on the wall.  Score! I've done this often for vacation photos to help fill in some blanks. I think as long as you don't claim it as your own photo, it's fine.


Here are the two pages together, showing how they will look in the album.  I'm really loving this collection and I think it will help me make my album very quickly.

Thanks for looking!
Sylvie

October 21, 2016

Learn Something New Every Day 2016

Hi there!

I'm up today showcasing my Learn Something New Every Day album for 2016. Every September, Shimelle Laine has an online class with daily journaling prompts to... well.... learn something new every day! I first took the class in 2011. I started another album the following year but because life got in the way, I didn't finish it. This year, I was adamant I was going to finish my album and I did!


I decided to make a small travel journal from an old October Afternoon 8x8 paper pad that was in my stash that had never been used. I cut 15 double sided pages to 8x5 and folded each page in half. I used my Cropadile to cut two holes in the fold and bound the book together with a long piece of jute. If I were to make another travel journal, I would make it longer.  I didn't leave me a lot of space if I wanted a photo and to journal.  Oh well.  Live and learn.

I went through all my 3x4 journaling cards and picked the ones that I thought worked with the theme.  It was great to get rid of 30 journaling cards from my stash.  What isn't so great is that I still have a photo storage box full.  ;)  But, there are only a few pieces left from the original paper pad and I used lots of older stickers, washi tape and ephemera pieces.  It feels so good to use stuff up!


The numbers were cut using my Silhouette and then glued on a scalloped circle punched from a Fiskars punch.

This album is mostly journaling, almost like a diary. I did use Shimelle's prompts in a few places but only if I didn't have anything to say for the day. There aren't a lot of photos. But, I'm okay with that because I think it will be cool to read this album in a few years.

Thanks for looking!
Sylvie

October 7, 2016

Hey Baby Let's Go To Vegas!

Hi there!

I'm up today with a layout I made using Shimelle Laine's latest line of Go Now Go (with a few scraps from some of her older lines).


Papers, Diecuts and stickers: American Crafts; Heidi Swapp Chipboard, Unknown rhinestones, mist

On September 23rd and 24th, I was lucky to attend Creative Scrapbooker Magazine's Scrapbook Carnival.  It was a lot of fun! There was oodles of creativity in the room and lots of vendors to shop from. In two days, this was the only page I managed to get done. I did also work in a mini album which I'll be sharing soon.

Part of the reason I only got one page done, was that I hand cut all the letters for my title.  It was very time consuming, but I love how it turned out. This Go Now Go line works beautifully with my Vegas photos and this page will serve as the title page in my album.

Thanks for looking!
Sylvie


September 23, 2016

Loving This *Not!

Hi there!

Trying to take a photo of your teenager can be a bit of a challenge.  (ok. She's 20 but it's not much better.) Today I am sharing a page of my daughter who did NOT want to take this photo. 


Papers: Pink Paislee; Embellishments: Pink Paislee, Crate Paper, American Crafts, Heidi Swapp; Bo Bunny

I used C'est la Vie and Paige Evans, Fancy Free from Pink Paislee and they worked very well together.  The two large flowers are fussy cut from a Fancy Free piece of patterned paper and they are the last two flowers from the only piece of paper I purchased.  I SO should have bought another sheet.  I adore those flowers.

This is a pretty simple layout but I love it so much.  Partly because it came together so quickly for me (that doesn't happen very often) and partly because that photo of Julia makes me laugh out loud.

Thanks for looking!
Sylvie

September 18, 2016

Key to Life - Art Journal

Hi there!

Today I am sharing an art journal entry inspired by Wilna Furstenberg ArtVenture mini class.


I started this page using some embossing paste with a Dylusions stencil.  Once it was dry, I sprayed the surface with water and while it was still wet, I sprayed Mr. Huey's and Dylusions mist over it all.  The water allows the mist to blend and flow to create new colours.  I only used coral, yellow and fushia, but the colours blended to make the orange and purple colours.  It's very pretty in real life.

I thought the colours of Wilna's flowers worked so well with my background.  The white crepe paper is just a party streamer from the dollar store. I added die cuts from my stash of odds and sods.  They are a mixture of Crate Paper, Pink Paislee and Echo Park.

While creating the page, I started with a white doily from the grocery store, but it was too stark against the bright background.  So, I did the wet misting technique again.  I love the result and will have to do this technique again.

I had my hand at doodling to give more texture and fill in some gaps.  I need practice. As I have mentioned before, I am no artist.

Thanks for looking!
Sylvie

September 10, 2016

Shine Bright

Hi there!

Today I am up with a layout of my daughter's college graduation this spring.

Papers: Crate Paper, My Minds Eye, Pink Paislee; Embellishments: My Minds Eye,
Crate Paper, Pink Paislee; Fiskars punch; Heidi Swapp mist


The red in Julia's cap and gown were bright red in person, put looked pinkish in the photos. Luckily the My Mind's Eye My Story collection had a colour that matched perfectly.  I fussy cut the flowers from a piece of paper and didn't really have much to do after that! There is hidden journaling on the tag with the tassel behind the large photo.  Really.  If you can't use a tassel sticker on a graduation photo, when can you?? LOL!

Thanks for looking!
Sylvie

September 2, 2016

Hello Sunshine

Hi there!

I'm up today with a layout that has been published in the fall edition of the Creative Scrapbooker Magazine featuring layouts about pets.This is a pretty simple page of my husband, daughter and I taking our golden retriever on a hike along Columbia Lake at Easter.

Paper: Crate Paper, Pink Paislee, Bazzill Basics; Embellishments:
Pink Paislee, Crate Paper, Heidi Swapp, Tiny Attacher unknown camera
rubber stamp; Mixed Media: Mr Huey's mist, clear gesso,

I wanted to add some mixed media to the background, so I used clear gesso to prep the cardstock.  It was great that the Crate Paper Journey embellishments matched the Pink Paislee Atlas papers. The "happy trails" words and arrow were on a piece of vellum shaped like a road sign which didn't really match the theme of my page.  But, I thought the words were perfect for a hiking page, so I just cut them out and used them in a different way.

Unfortunately, because I used the clear gesso on the background, it made the paper kind of gritty and difficult to write on.  If I would have known, I would have done the journaling differently.  Oh well. Once I started, I was committed.

Since I have a subscription to CSM, I do have an extra copy of the magazine to give away.  Just leave me a comment on this blog post telling us your favourite place to walk or hike and I will do a random draw and the lucky winner will win my extra copy! (Open only to Canadian or US postal addresses, please). Draw closes September 9th at 12:00pm MT. Good luck! 

Creative Scrapbooker is a great magazine and it's always an honour to be published by them. They are having a difficult time right now as one of their team members has passed away.  You can check them out at Creative Scrapbooker Magazine and give them some love.

Thanks for looking!
Sylvie

August 26, 2016

At The Beach

Hi there!

I'm up today with a summer layout that was inspired by Mercy Tiara where she placed some Fancy Pants corrugated cardstock behind a Silhouette cut file. And just like Tracy, I didn't have yellow paper, so I used some acrylic paint to make it the colour I wanted.


Paper: Recollections, Fancy Pants, Cosmo Cricket, Rouge De Garance; Scrapbook & Cards
Today Cut File; Embellishments: American Crafts, Cosmo Cricket: DMC floss, Studio Calico Mist,
rhinestones, Making Memories acrylic pain

Hand stitching has been on lots of scrapbook pages these days and I wanted to have a try.  It's kind of funny since I will procrastinate sewing a button on a shirt or hem a pair of pants for weeks, but spending a couple of hours stitching on a scrapbook page??  Well, that was a lot of fun!

I have all my summer/beach supplies in a travel drawer and I came upon an old pack of American Craft die cuts that I thought worked great with the colours of my photos.  So, since I was using old embellishments, I dug around in my scrap paper envelopes and found the Cosmo Cricket to use as well. I LOVE using old supplies.

Thanks for looking!
Sylvie

August 19, 2016

All the Flowers

Hi there!

I have a quick blog post today, sharing an art journal project.


When I started this project, I wanted to keep it light and airy.  I find that a lot of my art journal pages end up quite dark.  I'm sure some psychiatrist would have an insight into why that is, but I'm probably glad I don't know what it would be.

The background was created with Gelatos, then I applied a layer of texture paste with a stencil I cut with my Silhouette. I did some random stamping and splatters with gold Heidi Swapp Colourshine. The flowers were decoupaged using some hand cut petals from pages of an old book and some scraps of cardstock for the centers. The dragonflies were from my stash that I inked and distressed.  There is lots of scribbling and doodling.

This isn't my favourite art journal page.  My gel medium is getting pretty old and it was almost too thick to work with. And I messed up my doodles. But I did manage to keep the page light.  So that's something.  And I did have fun doing the page.  And really, that is the most important part. :)

Thanks for looking!
Sylvie

August 13, 2016

It's Time To Get Adventurous

Hi there!

I'm up today with a traditional layout that is the companion page to last week's page.


Papers: Bazzill Basics, October Afternoon; Diecuts: Crate Paper,
October Afternoon, Carta Bella; Embellishments: My Minds Eye buttons,
Technique Tuesday stamp, Studio Calico stamp, Ranger Distress Ink, Stampin Up Ink

There is nothing fancy technique wise

I purchased a die cut pack from the Great Outdoors by Carta Bella line a few weeks ago.  I loved the die cuts but the papers were a bit cutesy for my style. When I went to pick the papers for this page, I was so excited to see that they matched some old lines from October Afternoon.  I love it when that happens! As I was making the page, I felt like it needed some flowers or leaf accents.  I found the digital version of The Great Outdoors at Snap Click Supply and used the print and cut feature on the Silhouette to create my own embellishments. This is a great option for folks like me who live in a small town, who don't even have access to a local craft store let alone a scrapbook store. *sigh*

I have since read on line that the designer for OA now works for Carta Bella, so I am expecting to use more of my OA stash in the future!

Thanks for looking!
Sylvie


July 29, 2016

Princess Road Trip

Hi there!

I'm up today with a girlie page showcasing the lovely Fancy Free collection by Pink Paislee. I love this layout so much that I am sharing it twice! Well, sort of.

Papers: Pink Paislee, Recollections; Embellishments: Crate Paper, Shimelle; Silhouette doily
cutfile and title; American Crafts Thickers, unknown camera stamp, Studio Calico date stamp 

This page started off very easily. The water colour flowers just begged to be fussy cut from the paper. The design came together quickly and I was loving the page. Then it was time to do the journaling.  In my mind, I would write directly on the background page and it would look like something Shimelle Laine created.  She always writes directly on her backgrounds and the journaling always fits, never gets slanted and there's never any trapped space.  If you didn't know it already.... I am no Shimelle.


I tried adding embellishments to fill in the spaces.  That didn't work.  I tried redoing the title, but that didn't work.  I tried a different background, but I loved that ombre paper and I couldn't find anything else that looked as pretty. So, I took out some white cardstock, Mr Huey mist, Picket Fence Distress Stain and a large paint brush and made my own. The key was to start painting at the top of the page and working my way down to where there was hardly any mist on the brush.  In the places where I had too much mist, I used the Distress Stain to lighten it. In the end it looked almost the same as the original!


When the page was all put back together, I took no chances with the journaling and this time used my typewriter to print it out.

I just loved making the background page and I will have to recreate it again in many different colours!

Thanks for looking!
Sylvie

July 22, 2016

Pay it Forward

Hi there!

Today I'm sharing a quick hockey page of my son helping to coach some beginner hockey players at our local rink.


Papers: My Minds Eye, Bazzill Basics; Embellishments: Doodlebug, American Crafts, unknown buttons,
Scrapbook & Cards digital stamps, The Cut Shoppe digital cut file, Mr Huey mists

I started with the cut file of the stars from the Cut Shoppe and sprayed a bunch of mist from the centre in grey and light blue to give it movement. I mounted it on the red paper using some fun foam so that the top layer is lifted off the background.  It gives a cool 3-D effect.  The rest of the page is pretty simple. The red stars are the off cuts from the grey paper that I inked with Distress Stain to match the background paper.

Thanks for looking!
Sylvie

July 15, 2016

Just Breathe - Art Journal Page

Hi there!

Today I'm sharing an art journaling page. I love art journaling for trying techniques and just playing. But I find it very time consuming and I've been working extra hours and just haven't had the time.  But, this past week, I took a few days off for a "staycation" and spent a day playing on this page.


I made the background with acrylic paint and an old gift card.  There are layers of vellum, mulberry paper and washi tape over that. Using black StazOne, I randomly stamped one of my favourite background stamps in the brick design from Prima Marketing.  I think I've had that stamp for 10 years and it's permanently stained black.  I love that. 

I then used a Crafter's Companion stencil and more white paint. The embellishments are some old grungeboard  swirl from Tim Holtz, some Bo Bunny paper flowers and punched butterflies from Martha Stewart. 

When it was time to add my quote, I took a deep breath and had a go at some handwritten brush script. I used a Faber Castell Pitt pen and I'm pretty happy with how it looks.  It's a little crooked and my "k" is too short, but for my first time, I'm pretty happy with it. That's the joy of an art journal.  It really is just for experimenting and playing.

Thanks for looking!
Sylvie


Okay.  So it wasn't until I shared this blog post on Facebook that someone pointed out my mistake.  Here it is, all corrected.  I was sure this was where I would mess it up, but it went perfectly.  Whew!


June 30, 2016

Bloom

Hi there!

Today I'm sharing a mixed media page and professional photos of my beautiful girl.

Papers: American Crafts, Crate Paper: Embellishments: Crate Paper, My Minds Eye,
Prima Marketing, unknown ribbon, rhinestones: Mixed Media: Tim Holtz stencil,
embossing paste, Mr Huey's mist, dictionary paper, modpodge

I started by spraying lots of mist on a gessoed piece of cardstock. When it was dry, I used Mod Podge to glue some strips of old dictionary paper in random areas.  I used the Mod Podge in the centre of the strips and when the glue was almost dry, I peeled off the loose bits to give a very distressed look.
I then applied a thin layer of embossing paste using a Tim Holtz stencil. To help give the photos a place to rest, I glued strips of ribbon the length of the page.


I had hoped that more of the dictionary paper and the ribbons would show, but, that's the risk one takes when they do a mixed media background. 

Thanks for looking!
Sylvie


June 25, 2016

She Wears The Cone of Shame

Hi there!

I'm up today with a layout of our golden retriever, Miley.  Miley had to have surgery a few weeks ago and she was completely unimpressed by the cone. And while she was so sad, I can't help but be amused by this photo.


Papers: American Crafts, Bazzill Basics; Embellishments: Crate Paper,
Studio Calico, Tim Holtz; Stamps: Scraptivity, 7Gypsies; Miscellaneous:
Gelatos, Heidi Swapp and Mr. Hueys mist

This layout has a LOT of mixed media.  I started by painting the whole piece of white cardstock with gesso.  Then I used Gelatos mixed with water to brush the colour on the page.  The colours I used were Lemon, Butter Crème, Gold Champagne, Guava and Bubble Gum. Once it was dry, I sprinkled gold and black mist over the whole page.

I used some very old alphabet stamps from Scraptivity and 7 Gypsies and black Staz-On ink. Even though the stamps already have a mixed font, I combined the two sets to create even more of a mix. I haven't stamped a title in a very long time, but I think I might be hooked, again!

The photo cluster is from the Bloom collection and just some scraps of paper that were sitting on my desk. It's always better to use scraps than the throw them away!

Thanks for looking!
Sylvie

June 11, 2016

Sunshine

Hi there!

I'm up today with a girly page!  Yeah! It's been a while since I got to make one. And the best subject for a girly page is a selfie of my girl.

Papers: Crate Paper, American Crafts cardstock; Embellishments: Crate Paper,
unknown sequins, doily; Mixed Media: Gelatos, gesso

I've been seeing layouts with this triangle design for a while now and I had a bunch of branding strips on my desk, so I put them to good use.  The flowers are print and cut digital files that I bought from the American Crafts digital store. I am having issues with my Silhouette these days and after an hour fighting with my Cameo, I had to fussy cut them. Ain't technology grand????

I have some of the Bloom embellishments, but I'm anxiously waiting for my paper order to arrive. One nice thing about Crate Paper is that all the lines work so beautifully, together so I didn't have to wait to use the title or stickers.  The chipboard frame is from the Shine collection.

I thought the white background was too stark, so I just did the smooshing technique with some Gelatos in pink and yellow.

Over all, it's a pretty simple page, but I just love it.  Looking at it now, I wish I had put my photo cluster about an inch or two higher.  Anyone else do that?  Why didn't I see that before I did my journaling????

Thanks for looking!
Sylvie

June 3, 2016

In the Jungle

Hi there!

It's Canal Days weekend and so as I usually do, I post a layout of our parade float from the previous year. Our float last year included our daughters for the first time.


Papers: Bazzill Basics, Amy Tangerine, Basic Grey, Crate Paper; Embellishments: Sassafrass, 
Silhouette Diecut,  Crate Paper; Alphas: October Afternoon, Bella Boulevard;

The layout is straight in real life. I just could not get this photographed to be straight. I'm not going to confess how many tries it took and I still didn't get it right!

Once again, I have created a photo collage to cram in many photos on one page. ;) 

The page design is from Shimelle Laine's Perfect Collection class. A few years ago, I premade a lot of the background pages for my parade photos and this one worked well with the colours in the photos. I added the Crate Paper zebra paper (not sure I could ask for a better time to use THAT paper!) and the journaling paper. I love using old and new supplies together. The felt animal stickers are hoarded Sassafrass and I used them all up. So satisfying to know I saved them for a great cause.

I cut the leaves from white cardstock using my Silhouette.  I then painted them with Distress Ink and splattered water on them.  The ink reacts to the water and gave the leaves a great water colour effect which worked well with the teal water coloured Amy Tangerine paper.

I love this page!  I can't help but smile when I look at it.

Happy Canal Days! 
And thanks for looking!

Sylvie

May 27, 2016

The "Rockie" Season

Hi there!

I'm up today with a hockey page!  It's been a while since I did one and so I had a whole season's worth of photos to scrap. I decided to make a photo collage to get them all on one page.


Papers: Bazzill Basics, We R Memory Keepers, Pink Paislee, Crate Paper, Die Cuts with a View; Embellishments: October Afternoon, Crate Paper, Die Cuts with a View; Alphas: American Crafts (Amy Tangerine & Thickers), Stickopotomus

I used Photoshop to create the collage because it was easier to use than an app like PicStitch. They didn't have the template or size that worked for my needs since I had the one vertical photo.  I kept the page pretty simple because of all the busy photos. There are three small splatter groups by each embellishment cluster and that is it for mixed media.  The red and blue papers, as well as the grey background, are all very old pieces from my stash.  I stopped buying hockey supplies years ago and to my surprise, I am starting to run out!

The title is tongue in cheek - he played for the Rockies for one year, and he missed part of the season because of a concussion. It was a season of ups and downs and that is the theme of my journaling.

Thanks for looking!
Sylvie

May 14, 2016

Having Fun @ Rod & Gun

Hi there!

I'm up this week with a page I did during International Scrapbook Day weekend on May 7th.  It's based on a challenge by Inkie Quill's Grab 5 Challenge to use wood veneer, something gold, hearts, floral paper and word sticker/embellishment.


Papers: Crate Paper, American Craft, Simple Stories; Embellishments:
Crate paper, Simple Stories, Studio Calico

Those 5 items worked perfectly for the theme of this layout. I have been seeing a lot of scrapbookers making the fringe heart and I finally had a chance to make one for myself.  I pulled out the old Coluzzle cutter and it was so easy to make.

I wanted to handwrite my journaling right on the background page, but once I started doing the rough draft of a scrap piece of paper, it was quickly apparent that my story was too long for the space.  I didn't want to add another piece of paper over that lovely woodgrain paper, so I used another piece with the same pattern and printed it in the same area as where I wanted the journaling to go.  I cut the journaling in strips and glued it down.  In real life, it has a bit of extra texture, but it still looks like it's part of the background.

Thanks for looking!
Sylvie

May 7, 2016

50 Years Together

Hi there!

Today I'm sharing a page celebrating my parents' 50th Wedding Anniversary, using Pink Paislee's C'est La Vie collection. The minute I saw this line, I knew it would be perfect for these photos.


Papers:  Simple Stories, Pink Paislee, My Minds Eye, Fancy Pants; Embellishment, My Minds Eye,
Crate Paper, Ali Edwards Stamp, StazOn ink, Chatterbox alphas, Silhouette cut file,
American Crafts date stamp, Kaitlin Shaeffer labels, unknown button & floss


As their gift, my sister and I bought my parents a photo shoot and I couldn't be happier with how the photos turned out. They were taken in my back yard and I thought the weathered wood of the patterned paper matched the old wooden swing that my dad is sitting on.

The big flowers are fussy cut and placed on the layers of paper strips. I love that an old My Mind's Eye line matches the colours perfectly with the C'est La Vie collection.


I have used the Ali Edwards stamp often in anniversary cards and I thought it fit this spot perfectly.  It's a bit nerve wracking to stamp right on the page and as luck would have it the word "journey" looked fuzzy; almost like the ink had bled.  I think the stamp is starting to wear down from being used so many times.  So to save the page, I just traced over it with a black felt pen. I like the look and I'm toying with the idea of highlighting the word "life".

Thanks for looking!
Sylvie

April 29, 2016

When Cougars Take A Selfie

Hi there!

I'm up this week with a page that just makes me laugh out loud. I came up with the title and the rest just fell into place.  It only took me two hours to complete, which is a really fast page for this slow scrapper.


Papers: Simple Stories, We R Memory Keepers, Staples Cardstock; Embellishments:
Simple Stories, Crate Paper, Unknown camera stamp, Kaitlin Shaeaffer diecuts, Bella Boulevard;
 

The page itself is pretty simple.  I fussy cut the cat from one of the 4x6 cards and I sketched a speech bubble around "The Struggle is Real" and cut it out. The little labels are a free print out designed by Kaitlin Shaeffer.  They come in a bunch of colours and if you have a Silhouette, you can use the print and cut feature to cut them out. Unfortunately, I found the site and printed a dozen pages of them before I bought my Silhouette.  So, hand cutting it is.  :)  However, by leaving them on the sheet, I was able to run them through the typewriter quite easily first. I always look for a silver lining!
 
Thanks for looking!
Sylvie

April 22, 2016

50th Anniversary

Hi there!

Today I am up with a page I made about my parents' 50th Wedding Anniversary using Pink Paislee C'est La Vie.


Papers: Pink Paislee, Studio Calico Vellum, Unknown vellum bag, Recollection
metallic paper; Embellishments: Pink Paislee, Crate Paper, Heidi Swapp, My Mind's Eye;
Stamps: Heidi Swap, Kaiser Craft; Miscellaneous: floss, doily, thread

I just love the C'est La Vie collection. Since my family is French, this just seemed like a bit of an homage to our heritage.  ;)

The gold elements just pop with the colours in the papers.  I cut the pieces of the title from the metallic paper and my Silhouette.  The font is Pacifico which I manipulated in the software to work in the space I had available.

Thanks for looking!
Sylvie

April 9, 2016

Smile

Hi there!

I'm up today with a grad layout that isn't really a grad layout. ;)  These are photos of me and my parents after the grad ceremonies.


Papers: My Minds Eye, Crate Paper; Embellishments: My Minds Eye,
unknown rhinestones, Kerri Bradford cut file

The design of this page is based on a sketch from Shimelle Laine


My page is a lot busier that Shimelle's design, but I think the basic design is pretty obvious.  I just love this My Mind's Eye collection. Some of the florals are chipboard pieces and some are fussy cut. As are the butterflies.  It took some time to cut it all out, but the page really came together quickly for me.

Thanks for looking!
Sylvie

April 2, 2016

Never Grow Up

Hi there!

I am up today with my last grad page!  Woohoo!!!  I'm pretty happy that I only have two kids to scrap. Between the two, I have scrapped 42 graduation layouts in less than two years. I'm glad I have a few years before I have to scrap university graduation photos!  :)


Papers: Crate Paper, Bazzill Basics; Embellishments: Simple Stories, American Crafts,
Unknown sequins, unknown felt clouds; Studio Calico mists

The photos were taken by a professional photographer who came to the elementary school for a photo shoot. Only a few kids showed up, but the kids had the run of the playground and the school. Since the photos were quite bright, I wanted to  keep the background page a bit softer to let the photos pop.

There aren't a lot of techniques here. I used my Silhouette to cut the "Grow Up" from the paint swatch paper from Crate Paper.  I just placed the cutting mat over the paper to use as a guide to determine where to place my letters. Then I made sure to place the paper on the mat in the same orientation, ran it through the machine and I have multi coloured alphas. Easy peasy!


I had originally written my journaling directly on the background paper, but I couldn't read it through the little plus signs.  So, I used my typewriter to type the journaling and cut it into strips.  It's not the look I wanted, but at least you can read the writing now.

The papers are from Crate Paper's Shine collection. And the embellishments are mostly Simple Stories Carpe Diem.  Looking at the two collections side by side, you would never think they go together, but the water colour balloons and the quote strips were a perfect match. The bicycle is from Shimelle's True Stories.

There is a companion page with more photos of the kids inside the school.  They are acting naughty in the photos, so to protect the innocent (or guilty), I will keep that page private. It's inappropriate teenage humour, but it's pretty funny. What a great group of kids!

Thanks for looking!
Sylvie

March 25, 2016

I am smart. I am cool.

Hi there!

I'm up today with one of the last graduation pages for my son.


Papers: Pink Paislee; Embellishments: Crate Paper, My Minds Eye, Studio Calico;
Embossing paste, Silhoette stencil
 
I used my Silhouette to cut the title. It is based on the speech the principal made at the Grad Banquet where he listed funny things some of the grads had said in elementary school. This was Nick's quote from a self evaluation he did in Grade 3.  It is very much him. ;) In order to keep the page from being too cluttered, I wrote the journaling on a tag and tucked it behind a photo.
 
To add a bit of texture, I used some embossing paste and a stencil here and there on the paper. It's a pretty simple page and came together very quickly. To keep the page from being too cluttered, the journaling is written on a tag tucked behind the small photo.
 
I'll be up soon with my last graduation page.  Woohoo!! 
 
Thanks for looking!
Sylvie


March 18, 2016

Its Your Day

Hi there!

I'm up today with a quick and easy birthday card I made for a co-worker.


Paper: Crate Paper, My Mind's Eye; Chipboard: My Mind's Eye,
Silhouette cutfile; EK Success Punch; Sizzex Die, Tattered Angels mist

I had this flower in my stash from a previous project I made a while ago, It's made from crinoline fabric and the Tim Holtz Tattered Florals die. I sprayed three layers of petals with mist to die it. The diecut leaves were cut on my Silhouette out of white cardstock and then using water colours, I painted them green.

It so fun to use mixed media supplies to make my own embellishments.

Thanks for looking!
Sylvie

March 12, 2016

Grad Banquet

Hi there!

Today's layout is based on a couple challenges from Shimelle Laine using a colour block style and circles on a page.  I'm not sure if my grid layout still qualifies as colour block, but this is what I'm going with. :)

Papers: My Minds Eye, Shimelle for American Crafts, WeRMemory Keepers,
Bazzill Basics. Studio Calico, Recollections; Embellishments: Crate Paper,
My Minds Eye,  Pink Paislee, Unknown rhinestones, tags; Die cut: iHeart Studio

This page took on many incarnations in it's creation.  I started with placing the My Mind's Eye vellum over a piece of white cardstock and then mounting it on the diamond patterned paper, also from My Mind's Eye.  I wanted a bit more colour on the background, so I used my water brush and painted some shimmer water colour here and there on the vellum. When I began, I was worried that the water colour wouldn't dry on the vellum. It dried beautifully, but that vellum buckled like I'd never seen before! Even after leaving my heavy pizza box of paper on it over night, it still was warped.  But, it looked so pretty that I wanted to use it. So, I sewed it to the two pieces of cardstock. It's still warped and has bubbles in it, but it actually gives a very nice texture to the whole page. Mental note: don't paint vellum ever again!


I love this glittery rose chipboard piece from the Crate Paper Shine collection. Unfortunately, they only have the one piece and I wanted to bring another one to the top of the page for balance.  So, with my Silhouette, I cut the flower from an iHeartStudio file and used some Zing glitter embossing powder. I backed the flower with matching paper from the Shine collection and while it isn't exactly the same, it works beautifully.


I chose the Shimelle paper with the lightbulbs, because the venue for the banquet had many twinkling lights hanging down over each table.  You can see one behind my son's head in the photo above.

This page was a lot more work than I thought it would be (or should be!), but I'm so happy with it.

Thanks for looking!
Sylvie